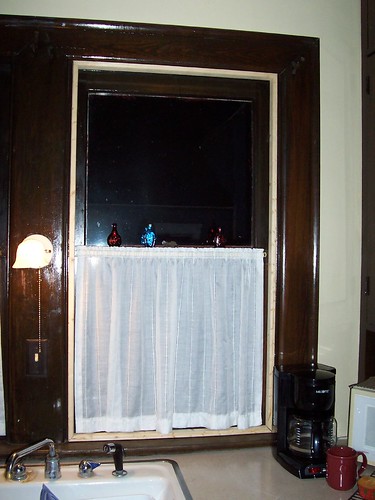
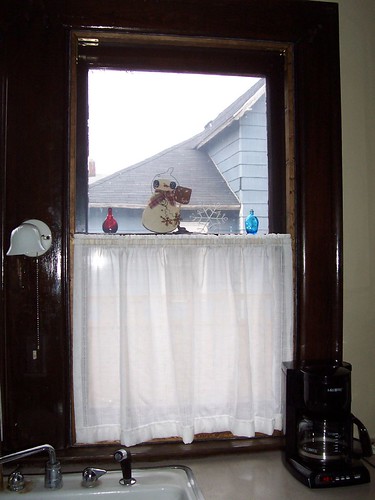
 Can you tell the difference between these two photos? Hint: it's not just night and day. It's the FINISHED interior storm window! The left one is the dry fit and the right one is the finished product. I decided to use common furring strips (1"x2"x8') and cut them to size for the window on a 45 degree angle. The bottom piece had to be cut with a compound miter joint to compensate for the slope of the sill, which took some figuring but worked out great. I then stained all the pieces prior to assembly with one coat of our ubiquitous Walnut stain. I'm down to the very bottom of the can and only put one coat on. On future storms I'll spend more time trying to match the window's finish, I really wanted to get this one done and see if it worked.
 They are held together with brass inside corner brackets. I wanted to use outside brackets and recess them but that would have required another trip to the store - next time I'll pay more attention to what I'm buying. Around the outside edge (between the storm and window casing) I stapled 1" wide felt weatherseal which really tightened it up. Then because the two long sides were bowing in, I added a cross piece about where the two sashes meet. This kept the sides tight against the frame.
 Finally I applied a shrink film insulation kit. It's simply double sided tape applied to the back side of the frame with a sheet of plastic stretched over it. The film is then shrunk using a common hair dryer. I had contemplated using plexiglass but it's more expensive than regular glass which would have required a heavier frame to support it. Then I found this suggestion to use the plastic film. It works great and is cheap to replace. Finally I moved the cafe curtain from the sash to the new storm.
Total cost was under $10 for this one window. I had planned on using screws and recessed screw bolts to secure the window but it fits so tight I didn't use them. If needed, I could drill a couple small (1/16") holes and use a finish nail to keep it from popping out.
I'm pretty pleased with the final result. It should really help reduce the draftiness on several of our windows that are missing exterior storms. I still haven't thought of a good place to store them in the summer though. Oh well. All that's left now is a shopping trip for more supplies(!) and to start cranking them out.
Pretty Cool! Would you mind coming to my house and doing my windows?
ReplyDeleteThanks Much,
Jim
http://foursquarerestoration.blogspot.com/
Your window looks great :) Makes me want to start stripping ours. Ahhh, someday.
ReplyDelete