
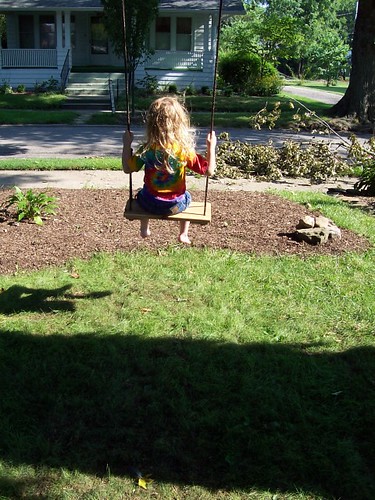
This size is great for kids but a little snug for an adult. To make the swing bigger, even a two seat-er, just be sure to brace it well and to check the maximum load capacity for all parts.
Hardware: Braided nylon rope 3/8", enough to reach from limb to ground twice plus 10' (I purchased brown, designed for hunting, but plain white or yellow would be cheaper); about 10' of twine; (2) lag screw eye bolts about 4.5" in length; (2) 5/16" quick link connectors or "S" links (these will allow for easy removal and installation each winter); wood screws, 1.5" long, I used leftover decking screws designed for use with cedar.
Wood: redwood or cedar are great outdoor choices. I used a scrap piece of cedar leftover from the fence project about 17" long, 1" thick and 8" wide. I also ripped a second piece into two 4" wide strips about 6" long.
Rope: $14
Hardware: $7
Happy kids: Priceless
First cut the braces as described above. Use a hand planer to round off all the corners and then sanded everything down with 60 grit paper. (One side was rough finished so I made it the bottom but still tried to smooth it out.) Then glue the two braces to the bottom of the seat, clamping it in place and countersink a few screws. Once the braces are secure, drill out holes for the ropes. It was easier to use a small bit (1/8") from the bottom and then use a 1/2" bit from the top using the smaller holes as pilots. That way the splintering occurred on the bottom rather than on the top of the seat.
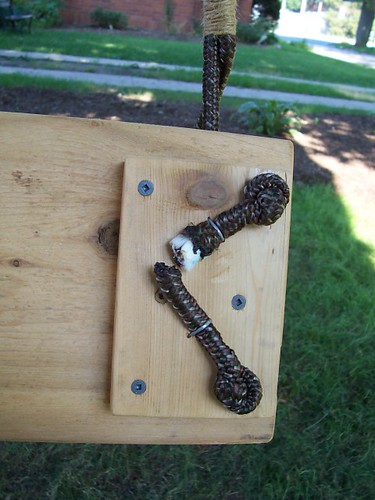 Cut two 4' lengths of rope. Use a match or lighter to melt the ends of the nylon rope or else it will unravel. Thread each end through the seat, granny knot it and secure the loose end with a fence staple or bent nail. Find the middle of each side, loop and secure by "whipping" a 2' piece of twine. This forms the connecting point between the seat and main ropes and keeps the seat more stable.
Take an electric drill, the eye screws and a screwdriver up a ladder to the branch that the swing will hang from. (An easy method is just to t ie the rope around the branch but it may rub off the bark, hurting the tree or the friction could fray and weaken the ropes. Be sure to select a sturdy branch that isn't too close to the trunk. Ours is about 8" in diameter and runs parallel to the ground.) Drill two pilot holes for the eye screws a few inches farther apart than the seat's width on the underside of the branch. This will help reduce twisting while swinging. Install the lag screws using the screwdriver to tighten them by inserting it through the eye.
ie the rope around the branch but it may rub off the bark, hurting the tree or the friction could fray and weaken the ropes. Be sure to select a sturdy branch that isn't too close to the trunk. Ours is about 8" in diameter and runs parallel to the ground.) Drill two pilot holes for the eye screws a few inches farther apart than the seat's width on the underside of the branch. This will help reduce twisting while swinging. Install the lag screws using the screwdriver to tighten them by inserting it through the eye. 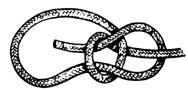
Next, tie one end of the rope to the connector or "S" link using a bowline knot and attach it to the eye screw.
Then cut the rope to length, about one foot from the ground. Repeat with the other side. (This method will allow for uneven branches but you may want to mark which side is closest to the trunk so that it won't be rehung backwards each spring.) Next comes the tricky part, you may want to have the kids around for a custom fit but they may be too excited to let you get any work done.

Tie the hanging ends to the loops on the seat using a Beckett bend knot and whip the ends with twine. Be sure to get the seat level. This may take some trial and error. The tallest kid should be able to touch the ground with the balls of their feet but not their heels. It's helpfu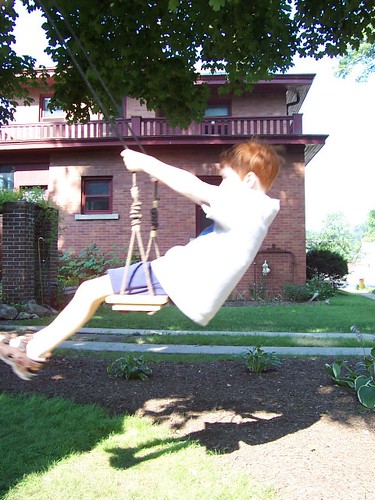 l if they can push the younger ones too. This will be a very strong knot but still allow to be loosened later when you need to raise the seat.
l if they can push the younger ones too. This will be a very strong knot but still allow to be loosened later when you need to raise the seat. Once all the connections are secure, set your daredevil down and let 'em fly. One maintenance tip would be to grease the connection between the links under the limb. It reduces noise, friction and provides a smoother ride. Enjoy!
This is my first visit to your blog- love your house- a porch and now a tree swing? You're making some idyllic childhood memories for those kids of yours. :)
ReplyDeleteThanks for the help on the tree swing. I could not get it correct until I found your site.
ReplyDeleteI put up a tree swing for my daughter's 7th birthday. It was a great feeling to get home from work yesterday, and hear the squeals of joy as my daughter and her friend played on it. Thanks for the excellent howto!
ReplyDeletePut up a tree swing today for my 2 and 4-year old boys. They absolutely love it!! Thanks for the how to, particularly the images on how to make the knots.
ReplyDeleteThanks for the great information. I just put up a swing according to your directions and my two girls love it!
ReplyDeleteExcellent instructions, especially the pictures of the recommended knots (as mentioned above)! You helped me build a great swing. Thanks!
ReplyDeleteI am a 48-year-old house wife and my husband and I are the only kids living in our house. For the 15 years that I've been living here, I've been eyeing a nice horizontal branch on an 80' +/- pine tree that is a focal point in front of my house. The branch is a nice fattie with no near-by obstructions and it is in the perfect location for areal views of the surrounding garden.
ReplyDeleteYour swing is going to make a great addition to my landscape. Thanks for the great instructions, in particular, for addressing my need for an attractive garden swing that addresses all my engineering concerns! I trust that you won't mind if I paint the seat purple, which is the color of all my other garden accents. ;) I'm also considering winding a grape vine (or similar vine) around the ropes that hold the swing (or at least the upper portions...), just for an added Tarzan effect.
One question, though. Why would one want to take it down for the winter?
I'd be happy to send a photo of it once I am finished, if you provide me with the info.
thanks for the compliments dategirl. You don't have to take the swing down. I was lazy and left it out all last winter. One reason to bring it in though is to keep the wood from being damaged by all the snow - depending on where you live :)
ReplyDeleteHello! I'm from Argentina. A couple of weekends ago I made 2 swings for my two sons. One was a copy of yours (for my eldest son (3 years old)) and another with a backrest for the youngest (1 year old). Mines were not as well finishes as yours tough! Thank you very much for your useful advices!
ReplyDeleteJust built a tree swing for my girls yesterday and I have to say it turned out PERFECTLY! My girls got home from school and jumped for joy!! Thanks so much for the direction. Home-made is always the way to go! xo, Gillian :)
ReplyDeleteIm thinking about building a swing for my daughter who has been wanting one since she was little, and i never knew what to do. now i do!! thanks...
ReplyDeleteHi,
ReplyDeleteI want to build this swing but, don't know what you mean by this:
"Find the middle of each side, loop and secure by "whipping" a 2' piece of twine".
Please advise or give details. Thank you
"whipping" a knot is a way to secure the loose ends with an additional piece of string. a quick google search provides several instructions and even videos of how to do it.
ReplyDeleteAfter three years, (and several rambunctious swingers) the whipped knots have long since unraveled. They don't seem to mind the ends hanging out, so I've just not bothered to repair it.
We have a question about the swings. We put two up side by side, and the one on the right swings crooked. Any idea why?
ReplyDeleteHi. Thank you for great advice. I too has the same problem as Vicky with crooked swinging . I have hung the swing with about 4 inches of height difference between the screw eyes due a slope on the branch.The swing is level. Do you know what causes the crooked swinging?
ReplyDeleteMaybe the child is sitting to far to one side. When my grandaughter sits like this the swing goes crooked.
ReplyDeletehow do you do this?
ReplyDeleteGreat! Had already made a seat and was looking around for tips on hanging a swing--this is the best and most complete set of instructions I have seen. Can't wait to do this next weekend.
ReplyDeleteAm a little confused by the section "Find the middle of each side, loop and secure by "whipping" a 2' piece of twine." Any photos of that step?
Thanks again!
Great! Had already made a seat and was looking around for tips on hanging a swing--this is the best and most complete set of instructions I have seen. Can't wait to do this next weekend.
ReplyDeleteAm a little confused by the section "Find the middle of each side, loop and secure by "whipping" a 2' piece of twine." Any photos of that step?
Thanks again!
Hi
ReplyDeleteJust wanted to say thank you for all the details- I've used them to make a swing this weekend and blogged about it here:
http://elinorjenkinsjewellery.blogspot.co.uk/2012/06/how-to-make-tree-swing.html
thanks again!
Kate
This is really interesting, You're an excessively skilled blogger. I have joined your rss feed and look forward to searching for more of your magnificent post. Additionally, I've shared
ReplyDeleteyour web site in my social networks
My web site : - Page 2 of 2 Super Duper Swing Sets for Kids
Get Complete Deatils about Best Tree Swings For Kids in 2020 . Reviews of 12 best outdoor swings, Rope Swings, with full feautres and safty for your kids.
ReplyDelete